FishProfiles.com Message Forums |
| faq | etiquette | register | my account | search | mailbox |
| Project Poor (Wo)Man's Planted Tank - updated with new plants and fishies | |
trystianity   Mega Fish Posts: 1028 Kudos: 926 Votes: 49 Registered: 20-Mar-2004   | For the first week or so (depends on what the plants are looking like/doing) I won't be adding any ferts to the water column. For one, I don't expect very much growth for a while at least until the plants get over the initial shock of moving, shipping and replanting. Secondly, using the peat substrate I want to see how it will affect my water column on its own without fiddling with anything. After I observe the tank for a while, I'm going to start dosing with some variant of [link=PMDD]http://www.thekrib.com/Plants/Fertilizer/pmdd-tim.html" style="COLOR: #36af30[/link].... Poor Man's Dosing Drops - seems appropriate here I think.  As far as fish go, I'm not sure yet. I've been thinking endlers or sparkling gouramis if I can get ahold of them, maybe another wild type betta. |
sham   Ultimate Fish Guru Posts: 3369 Kudos: 2782 Votes: 98 Registered: 21-Apr-2004  | $50 for a bag of eco complete?! Mine were $10 each. Cheaper than the mix you used.  Even ordering bags online will only cost $26, includes shipping, for me to get a 20lb bag. Even ordering bags online will only cost $26, includes shipping, for me to get a 20lb bag. If someone is starting out with nothing it would probably be better to get an all glass kit like the ones sold at walmart. The filter would be good enough for a planted tank and the only thing I'd replace is the heater. While my walmart heater is still working it doesn't have a temperature sensor so it's hard to set the exact temp. With the 10g hood you could use compact fluorescent screw in bulbs for about $8 a 2pack. It would probably come out cheaper than buying a $20 filter and the light strip seperately plus a glass cover to keep the lights from getting wet. Anything bigger than a 10g I wouldn't by the kits because you'll probably end up replacing all the extras with better quality. Last edited by sham at 19-Jul-2005 21:26 |
| katieb Fish Addict Posts: 697 Votes: 69 Registered: 03-Jul-2004 | If you want a stocking idea: 6-8 Pygmy Rasbora (Boraras maculatus) 6 Corydorus habrosus or panda 1 Spike tail Paradise Gourami Last edited by katieb at 19-Jul-2005 21:40 I'll do graffiti, If you sing to me in French. |
| trystianity Mega Fish Posts: 1028 Kudos: 926 Votes: 49 Registered: 20-Mar-2004 | All prices will be in Canadian funds of course so if you are American for example everything will be a lot cheaper! The tank I used was originally from a kit, the cheapest one I've seen anywhere, that I bought from W*lm*rt for $60. It came with an incandescent hood and the marineland cheapie mini filter without the bio wheel (smashed in a salvador dali print accident) and had to be replaced. Personally i think it was the biggest waste of $60 I could have spent since the only thing I have kept from the kit is the tank itself. The All Glass kits are much more than $60 here. For the equipment I would get from that kit, to buy it new only cost me $54 with an improvement of the quality of filter and the lights. Instead of a glass cover (too poor to buy one right now), I am using a piece of acrylic that fits on one side of the tank and holds the lights up. As far as the cost of ecocomplete goes, I have a link to their Canadian site: Big Al's Eco Complete Price It's $39.99 plus shipping, which will be a lot considering it is a 20 lb bag. Their in-store price is no better and local stores don't even sell planted tank substrates. Here is a link to the lights I used, which are actually selling for $8 each now: Undercabinet Fluoros I will eventually be building a custom hood that the lights will be installed in, or building a shelf over the tank with the lights installed on the bottom of it. This will happen as soon as $$$ and time permits. Last edited by trystianity at 19-Jul-2005 21:48 |
czcz Hobbyist Posts: 62 Kudos: 37 Votes: 0 Registered: 24-Nov-2004 | You're welcome, Tryst  Only input I can add is don't be afraid to add another of those lights, since you have CO2 and ferts available, and wpg benchmarks break with our small tanks. Project Poor (Wo)Man's Planted Tank is neat. Only input I can add is don't be afraid to add another of those lights, since you have CO2 and ferts available, and wpg benchmarks break with our small tanks. Project Poor (Wo)Man's Planted Tank is neat. I've not yet tried Eco-Complete, but peat+laterite+root tabs sounds like an excellent, nutrient rich, naturally ba --- http://justanothertank.com |
| sham Ultimate Fish Guru Posts: 3369 Kudos: 2782 Votes: 98 Registered: 21-Apr-2004 | I didn't think the exchange rate was that much difference  Bigals has EC for almost twice what I paid. So I still say it's quite cheap. Probably less for the EC in my tanks than the filter that tank is using. Bigals has EC for almost twice what I paid. So I still say it's quite cheap. Probably less for the EC in my tanks than the filter that tank is using. |
mattyboombatty    Moderator Tenellus Obsessor Posts: 2790 Kudos: 1507 Votes: 1301 Registered: 26-Mar-2004   | Cool tryst! keep us updated with pics and what not. I love tank logs that show progression over time. This sounds great! I think a pair of apistos would do well in that tank - or maybe just a school of rummys or some other tetra. Good luck  Critical Fertilator: The Micromanager of Macronutrients |
| trystianity Mega Fish Posts: 1028 Kudos: 926 Votes: 49 Registered: 20-Mar-2004 | The purpose of this log is to show everyone that it IS possible to have a (hopefully, we'll see how it turns out) nice planted tank on a really limited budget. I'm combining experience from past projects and trying a few new ideas and writing this as a combination log of my own experience and how-to. If anyone has any thoughts or suggestions as I go along, feel free to post. I'm going to be going through all of the materials I used and approximate cost of everything, the steps I take with it and really log everything as I go. I have really just used equipment I had lying around, but I will check prices of things online to give an estimate of what it would cost if you were buying everything new. It would be cheaper (I personally only spent about $50 if that) if used equipment was utilized. All prices will be in Canadian funds of course so if you are American for example everything will be a lot cheaper! Once I do a bit more work on my web space, this log will also have a home there. Anyway, let's get started. ba 10 gallon tank - easily found for $10 or so Penguin Mini Power Filter - $20 (this is what I already had, it may be better/cheaper to use a sponge or internal filter, you could also go filterless if you were planning on stocking lightly) 50W Heater - $10 DIY CO2 - yeast and 2L pop bottles - $5 Thermometer - $2 Lights: 2 x 15W undercabinet NO fluorescents from Home Depot - $12 each (you could just as easily cut it down to one light if you were feeling cheap, keep in mind this will limit your plant selection) Total: $71 Substrate: 20 lbs. Really Fine grade Aquarium Gravel (the stuff I used is almost sandy, makes it easy to plant. Don't worry too much about it compacting as long as the grains are over 1-1.5 mm)- $10 Bag of sphagnum peat moss (just use the rest in the garden) - $4 20 oz. Box of Laterite - $15 Total: $29 - Note that a 20lb bag of fluorite or eco complete will run you about $50 here, the substrate I chose gives excellent results for about 1/2 the price. Running Total $100 My Plant List: (yours will probably be different, all of them were obtained from free cuttings/donations (many THANKS cz!!!  ) etc. so I can't give prices): ) etc. so I can't give prices):Aponogeton ulvaceus Alternanthera reineckii Hygrophila polysperma Hygrophila corymbosa compact Cryptocoryne sp. Hydrocotyle leucocephala Glossostigma elatinoides Pogostemon stellata narrow leaf Rotala Rotundifolia Cladophora aegagropila (for now anyway) A lot of these plants were stuck in the mail for about a week and are showing signs of abuse. In particular the Pogostemon stellata lost ALL of its leaves and has been reduced to a small rooted stem section anchored in the substrate. I am hoping I can save them all but we will see. Setting up: The first thing you will want to do is soak your peat for a few days. It is far easier to work with it if it's soggy than have it blowing all over the place. Peat makes a huge mess, especially if you've never worked with it. When you are ready to set the tank up, grab hanfuls of peat, squeeze as much peat tea out of it as you can and mix it about half in half in a container with either very fine gravel or sand. You can save the peat tea in a bottle if you want, it makes a very good water additive for softening and dropping pH (basically homemade blackwater extract just use it sparingly and always test your water until you are familiar with it).I la Sloping the substrate towards the back of the tank makes it look nicer when viewing from the front (who wants to stare at 3" of substrate), allows for greater depth for deeply rooted plants with a minimum of ugliness, provides greater surface area of the substrate (means more planting space) and I find it much easier to plant. I have a trick for doing this that I haven't seen mentioned elsewhere so I will explain it here. Instead of fussing with a ruler or trowel or something or being really fussy as I lay the different la Leave the plastic cutting board on the substrate and start filling the tank. I find the cutting board works much better than a saucer or something for a few reasons. It has a greater surface area so the flow of water is dispersed more evenly over the bottom of the tank and it also floats as you fill up so I find that the substrate is disturbed far less as I fill the tank. Stop when you have a few inches of water in there, no more. NOTE: If you are using peat, the water will be REALLY MURKY. There is no way around this, I've tried to prevent it and it happens no matter what. As Douglas Adams would say, DON'T PANIC, leave it and once the tank is filled and you run some carbon in your filter it will eventually settle and clear. Plant and decorate the tank! Stick to the golden rule: tall plants in the back, short plants in front. If you're planting glosso may I just say it is a complete ]:|]:|]:|]:| to plant. The best advice I can give is to use some good tweezers, they make it a lot easier to tuck all of those tiny little ]:| stems and plantlets into the substrate but it is still definitely a chore. RESEARCH your plants before you place them. Some plants will need an unobstructed path to your lights, some may like a dimmer area in the tank. Some dislike current so you will want to keep them away from the output of any filters or powerheads, some will do just fine in higher current spots. You will also want to know the eventual size and shape of the plants so you can work them into the aquascape effectively. Try to get a vision in your head of what the tank will look like once it is planted. You are going for an aquascape, not an unkempt and unsightly jungle. Choose interesting decorations, wood and rocks, whatever you like that you can incorporate into the final plan. Some good aquascapers will plan a whole tank around an interesting piece of driftwood. Find something that inspires you, make a few sketches or spend hours dreaming about it before you get started. For my own tank i have chosen to make the plants the focus, so I am not using any wood or rock accents this time because I think they would detract from my eventual plan. I may add something as the tank fills in and I can get a better idea of how the finished tank will look. This is my (rough) plan, I can almost guarantee it will change as the plants start to grow. For now, it works:  After the tank has been planted you can continue to fill it. Before you do, grab that plastic cutting board again. you can float it on top of the water or hold it over your plants and it will prevent all of your hard work from being ruined by the current of the water as you pour it in. Now turn your filter on, try to ignore the murky water, sit back and have a drink! Pic of the tank a few hours after setup, day 1:  (Pardon the poor quality image, bad cam and some of it is probably shakey hands, and the water marks on the glass, I'll wipe them off before I get pics next time  ) ) My tank is not stocked as of yet. If anybody has any ideas they are definitely welcome. Last edited by trystianity at 27-Jul-2005 21:38[/font][/font] |
houston Fish Guru You want what when? Posts: 2623 Kudos: 2462 Votes: 337 Registered: 29-Mar-2003 | Tryst, that is going to look wonderful  What kind of lighting and all do the glossos need? I would like something like that on the bottom of a tankof course then how do you really do good, deep gravel vacs? looking good love the new growth alreadyhml What kind of lighting and all do the glossos need? I would like something like that on the bottom of a tankof course then how do you really do good, deep gravel vacs? looking good love the new growth alreadyhml"I've got a great ambition to die of exhaustion rather than boredom." Thomas Carlyle |
| mattyboombatty Moderator Tenellus Obsessor Posts: 2790 Kudos: 1507 Votes: 1301 Registered: 26-Mar-2004 | I think it's incredible how some plants can come back from the (seemingly) dead. I have chopped off ALL the leaves on an amazon sword and watched it come back and thrive, and I've done the same to a crypt wendtii and they are now starting to come back and look very healthy. The crypt took quite a bit longer than the sword, but the end result is still amazing. Looks great so far tryst, Thanks for all the new pics, the glosso is "cute" as you put it! I'm pretty sure that I've seen sparkling gouramis in there (oddly not since I've been working there, but before). They aren't a "regular" fish that is in there every day, but I'll let you know if I see some. Another thing you might try is killis - we get many different kinds in pretty regularly. Last edited by mattyboombatty at 21-Jul-2005 09:43 Critical Fertilator: The Micromanager of Macronutrients |
| kankushok Hobbyist Posts: 50 Kudos: 51 Votes: 12 Registered: 18-Jun-2005 | I had an amazon sword disappear for a few months, and then start growing again. |
DaMossMan Fish Guru Piranha Bait Posts: 2511 Kudos: 2117 Votes: 359 Registered: 16-Nov-2003  | I love your project and looking forward to the updates and more pics as it develops : ) I'm changing over 2 tanks and also like you, don't want to pay thru the nose. So I try and buy/trade with aquarists in my area.. Traded a clown loach for a 1 foot amazon sword, and the larger leaves aren't so healthy so now I'm thinking of doing the 'mattyboombatty chop' after reading your post, will monitor the plant for now. Flourite in toronto is 7kg bag (approx 15 pounds) for $35. tax included Big Als.. You're right it's SOO expensive.. The Amazon Nut... |
| trystianity Mega Fish Posts: 1028 Kudos: 926 Votes: 49 Registered: 20-Mar-2004 | DAY 4 - Sorry it's late, I was finishing the DIY Yeast bit Did some random trimming, pushed more glosso back into the substrate. Biggest addition for today is 2 additional 15 W NO fluoros, making a total of 60 W on this tank, so 6 wpg. It isn't very efficient for now until I build some better reflectors, the lights are basically just sitting side-by-side on the top of the tank. Increased capacity of DIY CO2 yeastie-beastie system to 3 Litres, may add a second bottle or go up to 4 L depending on results. I'll take this post as an opportunity to explain setup of Yeastie-Beastie System. It's actually REALLY simple. In fact, I think this is probably the simplest method of yeast co2 production I've seen. This will be saved in a better permanent article, I spent too much time on it to just have it wither away in this post and it's really an article in its own right. Before you do ANYTHING, you need to decide if CO2 is right for your tank. Lower light tanks with undemanding plants will probably not require CO2 supplemantation and will provide far less frustration and headache to the beginner. If you're looking at a very high light tank with difficult plants and very dense planting, you are probably going to need some added CO2. If you can avoid using CO2 it is probably better to go without. While the use of CO2 has definite advantages, it can go wrong (especially in the hands of a complete beginner) and unfortunately the outcome of a mistake with CO2 can be disastrous. Personally, I would not advise using CO2 in tanks under about 2 wpg. The most important step in doing anything in this hobby is RESEARCH, but unfortunately it seems to be the one that is most often missed. Do your research before you start, have a well thought out plan and stick to it. After you've done all of your reading and you've decided that a yeast ba Spend a bit of extra cash on some good airline tubing, I like to use the more flexible silicone stuff because with it I haven't had to use any extra fittings and it seems to self seal when you just jam it through the hole in the bottle cap. Normal airline works OK (fine for this project if you wanted to use it) but I find it harder to work with and doesn't seem to seal as well. You can also buy airline tubing especially made for CO2, which will mean that you won't have to replace the tubing. Regular airline supposedly leaks some CO2 and silicone will eventually toughen and crack when used for this purpose but so far this hasn't happened to me yet. Wash the bottle, airline and cap out with boiling hot water. When the tubing is nice and hot, pull and stretch it to straighten it. Next you need to decide how you are going to transfer your CO2 from the airline to the water. I like to use a CO2 bell diffuser, on this tank I'm using one that came with the Jungle CO2 kit, but even a pop bottle with the bottom cut out of it works. If you're going to make a pop bottle CO2 bell, just cut the curved top off of a 500 mL or similar sized plastic bottle. Choose a drill bit that is just a bit smaller than the diameter of your airline tubing. Drill a hole in the side of the top part (with the cap) toward the bottom, ram some airline through it and attach it to the back of the tank with suction cups. If you don't have suction cups you can even just attach a heavy rock to it somehow to weigh it down. The CO2 collects in the bell and pressure inside of it causes the CO2 to dissolve into the water. I like using a bell because it's very simple and I've had good results with it in the past. The cap is important because it lets you purge the system occasionally to release trapped N2 and O2, I like to do this when I replace my mix. If for some reason a bell diffuser seems too complicated, it is acceptable to just use an airstone to make the bubbles smaller so more of the CO2 is in contact with the water and can dissolve into it. You won't get as much dissolved CO2 from this system this way but your plants will still show some benefit. I don't suggest using an airstone alone for a higher light tank but feel free to experiment on your own. There are other types of diffusers, bubble ladders, etc. out there, look around and find what you like. Diagram of pop bottle CO2 Bell Diffuser:  Please feel free to use your own creativity for this, almost any container can be used to make a bell diffuser or you can even purchase premade glass ones. Now back to the main CO2 system. Jam a piece of airline about 8-10" long through the cap of your big bottle. If the hole you drilled was small enough it should self seal. If not, get some aquarium silicone and seal the cap and airline from the inside of the bottle. Alternatively you can use some kind of plumbing fitting for it. You will want about 2 cm of airline sticking through to the inside of the bottle if you just stick in in. Connect your one-way check valve to the other side of the tubing. This is a really important step because without it you could accidentally start a siphon from your tank and end up with a whole tank of water on the floor. Not good. A check valve will keep you covered. Anyway, now that you've got that, connect the other end of the check valve to the CO2 diffuser. You should have something that looks like this:  Try to keep the path of CO2 from the bottle to your tank as short as possible. Less airline = less back pressure. Now to mix your yeast: A lot of people that write about DIY CO2 using yeast have apparently never cooked with it or researched it thoroughly before. To get yeast production immediately you will need to activate your mix. Follow the directions given on the package. I use Fleischmann's Quick-Rise but anything you pick up at the grocery store will do. Activating your yeast gives it a nice head start and I find that I get more CO2 production in the long run when I do it. First you need to get some warm water, use a thermometer to measure the temperature because too cold will not activate as quickly and too hot will kill your yeast. You want the water between about 100F-120F, and you'll need about 1/4 cup for activation. Instead of fiddling with the tap to get the temperature right, it is much easier to microwave it. Dissolve about a teaspoon of sugar in the warm water, drop in the desired amount of yeast (for my mixes I use anywhere from 1/2-2 tsp depending on how much CO2 I want.....1 tsp is a good starting point - don't use too much or your yeast mix will foam too much in the bottle and end up in your tank). Also remember that if you use more yeast you will need to replace your mixture more often because Stir the mixture really vigorously until all of the yeast is dissolved (no clumps) and you've got some air bubbles at the top of it. Let the yeast mixture sit for about 10 minutes to activate until it gets really foamy. Meanwhile, fill your yeast bottle up about 1/3 of the way with HOT tap water. This makes it easy to dissolve your sugar and you will be using a lot of it. Now dissolve between 1-2 cups of sugar in the hot water. At this point you can add any additives, I've seen some people use molasses, protein powder, I have used skim milk powder, all kinds of things are added to teh mix in the interest of improving it. Try whatever you want, just remember to read the guidelines below. More sugar will keep your yeast alive and feeding longer, extending the production of CO2. The often quoted advice that using too much sugar will form alcohol too quickly and kill your yeast is bunk. For this to happen you would need a ton of sugar in there, 2 cups or even a bit more isn't going to do it. Shake the bottle to dissolve your sugar, then fill the bottle to 2/3 with COLD tap water. Test the water temperature with your fingers, it should just be warm. Now dump your activated yeast mixture into the bottle, shake it up REALLY WELL. If anyone tells you not to shake your yeast mix, that's bunk too. You'll want to shake it a lot to disperse the yeast evenly through the mixture and incorporate a lot of dissolved O2 to the mix. The longer conditions in the bottle are aerobic, the longer CO2 production will last. Now fill your bottle up to about 3" or so from the top. If you overfill your bottle there is a chance it could overflow and make a mess in your tank. Connect everything together and watch for bubbles. You're generally looking for about 6-7 seconds between each bubble, production will be much faster when the culture is initially started.To recap the basic starter recipe: This is what I would suggest starting with to get a gauge on how much CO2 a DIY yeast system will make before you start messing with any modifications. - 1/2-1 tsp baker's yeast - 2 cups sugar (plus one tsp for activation) - Enough water to fill your bottle Leave the mix to do most of the work for you, but you'll want to give it a shake every few days or so to disperse your yeast more evenly through the mix so more of them have access to the nutrients you've provided them with. As I stated above, you will also need to purge your CO2 Diffuser Bell if you're using that method when you change your bottles. Depending on the mix you use, it should only need replacing every few weeks. There is no reason to stop CO2 production at night when the lights go out. Your fish will be fine. Adding CO2 to your tank will alter your pH and consume your KH (buffer) so, until you have a bit more experience with it, it may be a good idea to test your water frequently to make sure nothing bottoms out and to make sure you are producing the right amount of CO2. In a high light tank with a lot of fast growing and CO2 loving plants, you're looking at as much as 20-30 ppm CO2, lower light with plants that don't need it so much will require less of your DIY system. More than about 30 ppm is not recommended firstly because the plants won't use it, secondly because it may harm your fish. I'm not going to go into the method of calculating dissolved CO2 here, google it if you want more info. I personally don't use test kits anymore to determine how much CO2 I'm making, I just let my fish and plants tell me what they need. I don't reccommend this method to the beginner because I think it is a good idea to get some experience and knowledge in working with the numbers before you go off on your own. Think of learning to ride a bike - you start with training wheels first. A miscalculation when working with CO2 can be harmful, always keep that in mind. If you're using a bell diffuser, let it be your guide. If the diffuser is overflowing constantly, you are producing too much CO2. If it's always empty, you aren't producing enough. Either way, you will need to fiddle with your culture a bit. At this point if you want to keep everything really simple, stop reading here. The mix I have outlined above is fine for most people, the tips below are really just more specialized info that real DIYers will appreciate. Some notes on modifying your yeast mix, tailored to your needs: You'll want to use some experimentation here, using yeast to create CO2 is not by any means an exact science. Yeasts are unicellular fungi. The species used in baking, alcohol production and the one we're using here is known as Saccharomyces cerevisiae just in case you wanted to know, living creatures that respond fairly predictably to changes in their environment. There are many strains of this yeast available that are produced with different properties for different purposes. Some hobbyists recommend using a wine or beer-making yeast for a better mix, but the ordinary baking grocery store variety is just fine. You won't always be able to predict the exact output of CO2 in your system. This, in my opinion, is the DIY yeast CO2 method's biggest fault. A few guidelines to help you tailor and care for your own yeast culture: 1. Yeast will produce more CO2 if kept warm, less if kept cold. This is a double edged sword. In a warm environment you will have better CO2 production, but your mix will be exhausted faster. If kept too hot you will kill your yeast. 2. Some people recommend adding baking soda to your mix to buffer it and prevent the acid produced in fermentation from killing the yeast. This is also bunk. Yeast thrives in low pH, increasing the pH of your solution with baking soda will only slow production. Any salts added to your mix are detrimental to the yeast culture. This includes baking soda. 3. Yeast does not like salt. Keep salts out of your mix unless you want to inhibit growth and production of CO2. The same goes for fats. 4. Yeast multiplies fastest (and creates more CO2) in well aerated and oxygenated conditions. If you take the cap off of your mix every few days to let some air at it before you shake it, you will prolong the life of your mix and get more CO2 out of it. I like to do this at night when the plants aren't in need of as much CO2 and it doesn't really matter so much if there is some fresh air being added instead. I have seen a few sites that say the goal of a yeast culture is to keep it anaerobic. More bunk. Yeast will survive anaerobic conditions but production of CO2 in this state is really diminished. You want some dissolved O2 in your mix to keep your yeastie-beasties happy. 5. You can "feed" your yeast some nutritious amino acids in the mix to increase production. The simplest and cheapest source of these is skim milk powder from the grocery store, but you can also use protein or wheigh powder from a health food store. Don't use too much, a spoonful will do (I tend to do all of this by eye). 5. Bacteria is the enemy. Bacteria in your culture will severely decrease the life of your mix. Keep everything very clean especially when you're mixing your ingredients and culturing media to keep the bacteria out. To do this I have even sterilized my bottles, but if you're feeling lazy a rinse in very hot water will do. This brings up another point for why you shouldn't be adding any baking soda. Yeast will survive acidic pH quite nicely, while most bacteria is completely intolerant to it. In the fight against bacteria, oxygen is also your friend. read the tips above for keeping your mix aerated. 6. More yeast will give you more initial production of CO2 but the shelf life of your mix will be reduced. If you use way too much yeast it could even foam up and overflow into your tank. Use some sense here. 7. Experiment with more sugar if you want, I don't recommend using less than what I have suggested above because doing so would only decrease the life of your culture and there is no proven benefit in doing so. More sugar may extend the life of your culture as long as you don't go completely crazy with it and use the whole bag. I think that covers everything, I may add more if there are questions about anything that seems unclear or if I think of anything I have missed. This system isn't perfect, the aim was more to simplify it enough that it is as easy and as inexpensive as possible, and seems accessable to any hobbyist that would like to reap the benefits of using CO2 on a planted tank.For more info about DIY Yeast CO2 setups, yeast itself, etc., probably more than you will ever need to know, here are a few links: http://maltosefalcons.com/tech/MB_Raines_Guide_to_Yeast_Culturing.php http://www.cichlid-forum.com/articles/diy_co2.php http://www.qsl.net/w2wdx/aquaria/diyco2.html http://www.thekrib.com/Plants/CO2/co2-narten.html http://www.hallman.org/plant/booth1.html http://en.wikipedia.org/wiki/Yeast http://www.google.com [/font][/font] Last edited by trystianity at 23-Jul-2005 20:21 |
| trystianity Mega Fish Posts: 1028 Kudos: 926 Votes: 49 Registered: 20-Mar-2004 | DAY 6 No changes today but I do have some new pics: Full tank shot:  The A. reineckii looks pale in this shot for some reason, it's much nicer in person, the bottoms of the leaves are taking on a nice deep red. My pennywort is pearling.  Hygrophila corymbosa "compact" doing nicely and starting to blush.   My Aponogeton ulvaceus seems to be blushing too, I've never seen it do this before, but I've also never kept it under this much light. Looks pretty. 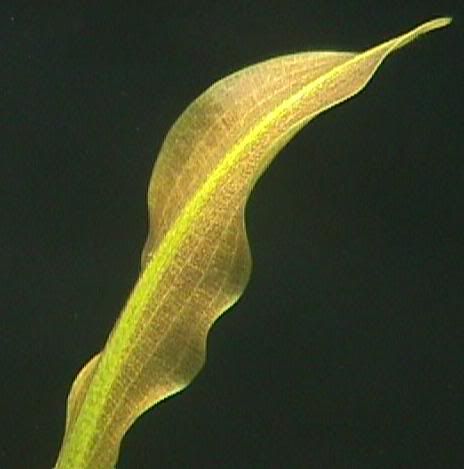 That's all for today. [/font][/font][/font][/font] |
| trystianity Mega Fish Posts: 1028 Kudos: 926 Votes: 49 Registered: 20-Mar-2004 | DAY 7 Did some pruning, especially of Rotala Rotundifolia. This stuff grows like a weed in my tank.  Also did some pruning of A. reineckii and H. corymbosa. Removed 1 crypt plantlet to try emersed growth with it in a separate container. Also did some pruning of A. reineckii and H. corymbosa. Removed 1 crypt plantlet to try emersed growth with it in a separate container. Altered CO2 mix a bit, added more sugar (up to 2 1/2 cups), doing an experiment with 1 tbsp. flour added as yeast food. We'll see how it goes, so far standing at about 30 ppm give or take. New pics for today: Full tank shots:  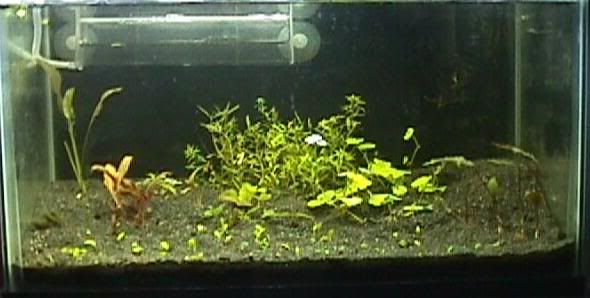 H. corymbosa "compact" again:  A. reineckii.....I didn't see the torn leaf before i uploaded the pic, will remove it.  And it looks like I'm going to save at least a bit of that P. stellatus, here's a few pics of a portion of it that seems to be thriving now! Let's hope I don't mess something up and it continues to do well.   EDIT: Answering a few questions: Gravel vacs - easy answer. You don't do gravel vacs on a heavily planted tank, at least not in the traditional sense of the term. All of that mulm that builds up from fish waste and food is good for your plants so there's no reason to remove it. A buildup of mulm on the surface of your substrate can look a bit unsightly, if this happens you just swirl the smallest gravel vac you can buy over the substrate to remove it. Don't toss it out though, it's great for the garden. Glosso lighting - high. Without enough light your glosso will grow vertically toward the light instead of spreading horizontally and will look ugly. I'm thinking you would want over 3 wpg (might be wrong on a larger tank), adding the extra lights on this tank has made a real difference in growth of it, it's growing much closer to the substrate. Last edited by trystianity at 25-Jul-2005 23:57[/font][/font][/font][/font][/font][/font] |
| Jump to: |
The views expressed on this page are the implied opinions of their respective authors.
Under no circumstances do the comments on this page represent the opinions of the staff of FishProfiles.com.
FishProfiles.com Forums, version 11.0
Mazeguy Smilies