FishProfiles.com Message Forums |
| faq | etiquette | register | my account | search | mailbox |
| Mega Powerful Nitrate and Phosphate Remover - DIY! | |
santamonica Enthusiast Posts: 152 Kudos: 17 Registered: 19-Sep-2008   | Mega Powerful Nitrate and Phosphate Remover - DIY! Are you tired of green on your rocks? Do you have to clean your glass more than once a week? Well then I'm sure you've been told (or you've figured out) that your Nitrate and/or Phosphate are too high. Sure enough, if these are too high, the green starts growing. Phosphate is the important one: If you can detect any phosphate at all with a hobby test kit (like Salifert), then it's high enough to cause algae to grow. So, what can you do? Build an algae filter screen, that's what you can do. An algae filter screen, also known as a turf algae filter, a turf scrubber, or an algae scrubber, basically filters the water clean of nitrate and phosphate so that the green on your rocks and glass goes away. It does this by "moving" the growth of the algae from the tank to a "screen" outside of the tank. The idea is that you create a better growing environment on the screen than occurs in the tank, so that the algae grows on the screen instead. It works great! Here's what you can expect: If you build your algae filter properly, your nitrate and phosphate will be incredibly low, sometimes unmeasureable by hobby test kits, within four weeks. I use Salifert test kits, and the readings I get are "clear" (zero) for both the Nitrate and the Phosphate tests. This is what you want. If you have been trying to get this yourself, then an algae filter is for you. Here is my Algae Filter in a 5-gallon bucket; it's the only filter I have (other than the live rock) on my 100 gallon reef: 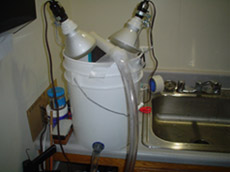 Here is the filter in operation with the lights on: 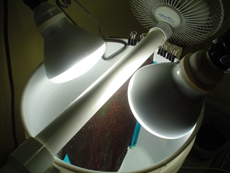 Here is my tank:  Hi-Res: http://www.radio-media.com/fish/WholeTank.jpg Video: http://www.radio-media.com/fish/WholeTank08-11-08.mpg And here are the only things you need to build a bucket version of this filter:  My nitrate and phosphate are zero (clear on Salifert test kits), and the only thing in my sump is water. I removed the skimmer, carbon, phosban, polyfilter(s), and filtersock; I don't use ozone, vodka, zeo or anything else. I'm feeding massive amounts too; enough that if I had my previous filtering setup, I'd have to clean the glass twice a day, and everything in the tank would be covered in green or brown algae. Amazing. The only thing you need to decide on is how big your algae filter screen needs to be, and if you want it to be in your tank's hood, or in a bucket, or in your sump. The basic rule is one square inch of screen for each gallon of tank water, if the screen it lit on both sides; the screen size should be twice this if the screen is lit up on just one side. A 12 X 12 inch screen, lit both sides, = 144 square inches = 144 gal tank; a 7 X 7 inch screen lit both sides = 49 gal tank; a 6 X 6 lit both sides = 36 gal tank. Algae filters get really small as you can see. A 12 gal nano tank needs just 3 X 4 inches! This small thing can replace the skimmer, refugium, phosphate removers, nitrate removers, carbon, filtersocks, and waterchanges, IF THE PURPOSE of these devices is to reduce nitrate and phosphate. If these devices have any other purpose, then they can't be replaced. If your tank is bigger than a 75, then just start with a 5 gallon bucket size and see how it goes. You can always add a second one, or build a bigger one later. My example bucket version takes about 4 hours to build. Water goes in the pvc pipe at the top, flows down over the screen, then drains out the bottom. That's it! Oh, and it has clip-on lights. I can feed the tank a lot of food, and anything not eaten by the corals or fish eventually ends up as algae on the screen. Here are some examples of DIY algae filter screens already built, from a simple nano one:  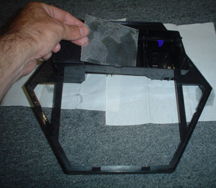  to larger ones: 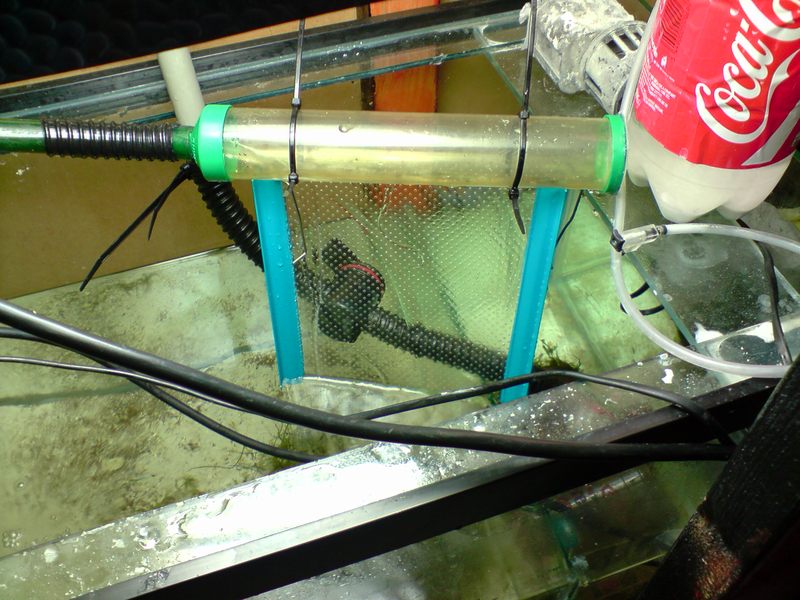 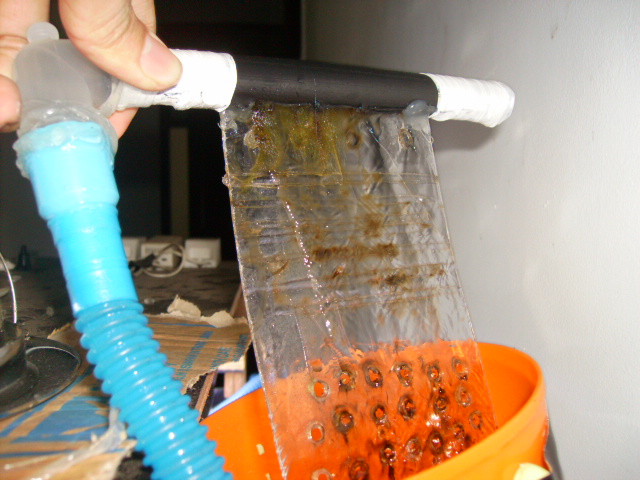 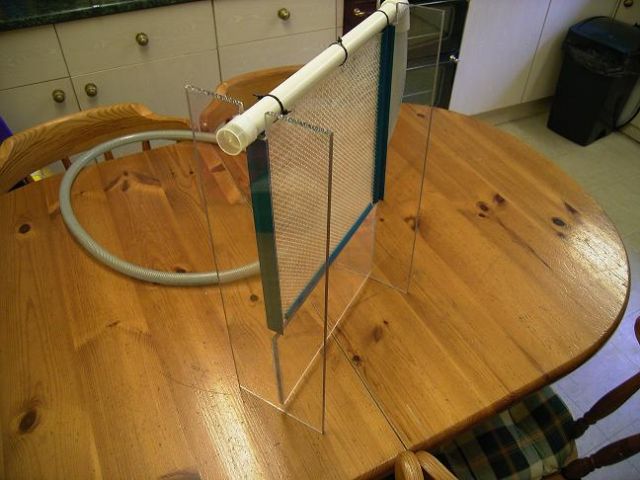 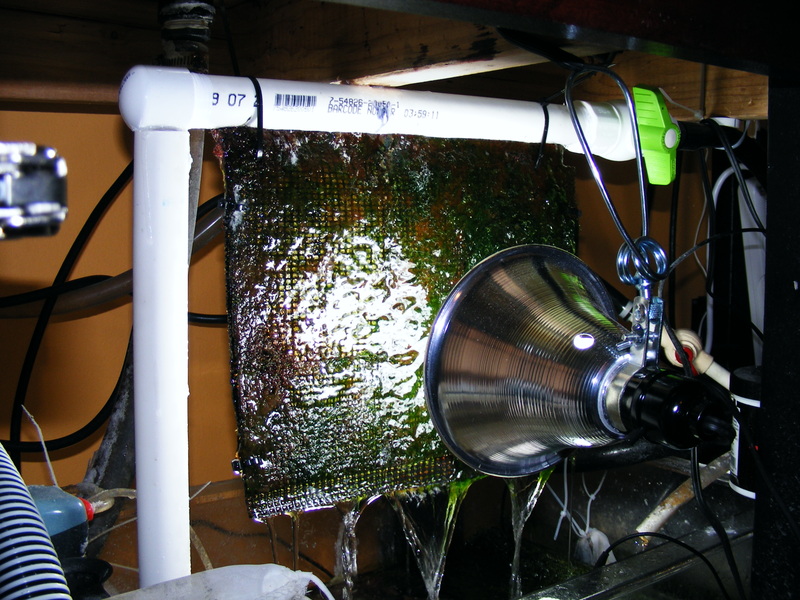 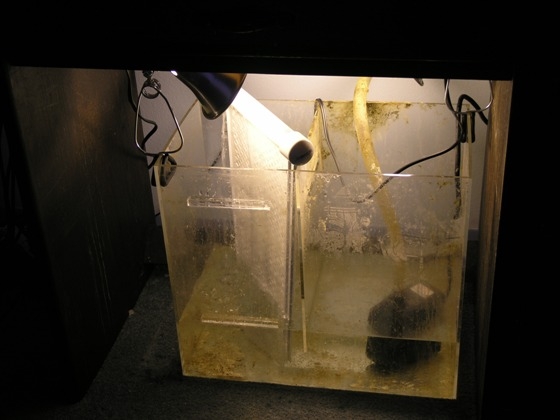 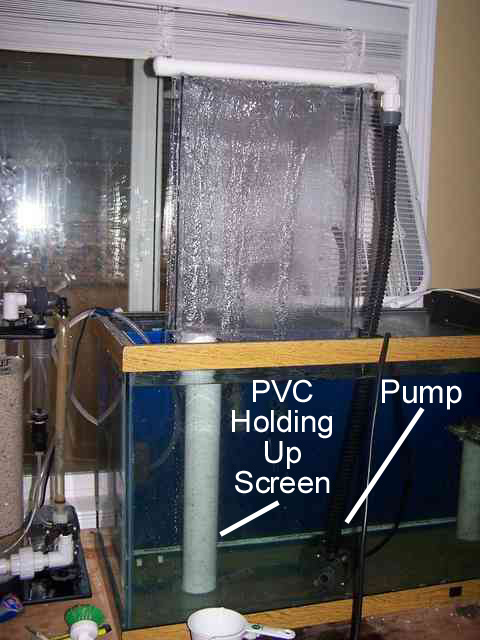 Here are some advantages of an algae filter: o Allows you to feed very high amounts without causing nuisance algae growth in the tank. o Can replace waterchanges, IF THE PURPOSE of the waterchange is to reduce nitrate or phosphate or algae growth. Otherwise, it does not replace the water change. o Grows swarms of copepods. o Increases pH. o Increases oxygen. o Will NOT spread algae into the tank. It removes algae FROM the tank. o There is no odor from the algae (only a slight ocean smell when cleaning it). o Is very quiet when flowing, similar to a tabletop decorative waterfall. o Introduces no microbubbles when adjusted. o Removes ammonia too. o You can even make a portable bucket! Just unplug the lights, lift up the pump out of the tank water, and go put it in your next tank (or your friend's tank). Don't let the screen dry out though. o Works in saltwater or freshwater. How to build it: First, get your screen. Any stiff material that has holes in it, like knitting backing, plastic canvas, rug canvas, gutter guard, or tank-divider will do. Try going to hardware stores, craft stores, garden stores, sewing stores, or just get one of these online (in order of preference): http://www.craftsetc.com/store/item.aspx?ItemId=43844 http://www.herrschners.com/products/product.aspx?sku=137850 http://www.aquaticeco.com/subcategories/2/Tank-Dividers/tank%20divider/0 Don't use window screen though. The main problem with this kind of "soft" screen will be getting it to hold its shape; it will bend and fold too much. Stiff screen is easier to make stay put, and easier to clean. If you have a nano with a filter hatch on top of the hood, then it's super easy: Just cut a piece of screen to replace the sponge filter, and put it where the sponge filter went. Leave the hatch open, an set a strong light on it, facing down directly on the screen. This is a good bulb to get; it will be bright enough to power the screen, and to light up your nano too: http://www.buylighting.com/23-Watt-R40-Compact-Fluorescent-Flood-5100K-p/tcp1r4023-51k.htm If your nano does not have a filter hatch on top of the hood, or if you have a regular tank, then here are the larger versions:  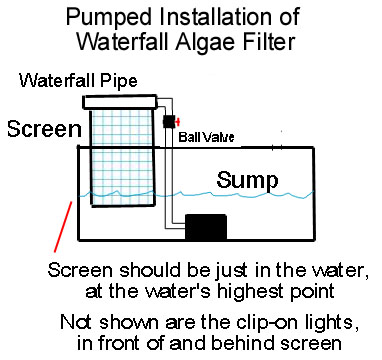 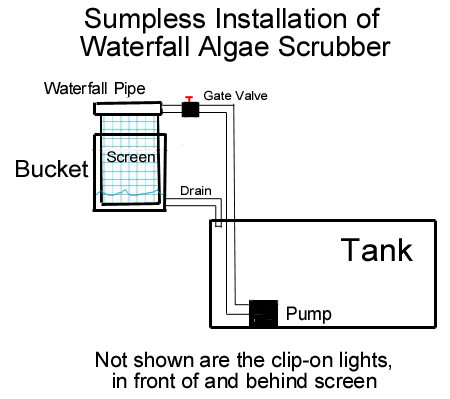 The first and main thing to consider is the flow to the screen. You need about 35 gph (gallons per hour) for every inch of width of the screen. Thus, a 2" wide screen would need 70 gph, and so on. Here is a chart: Screen Width-----Gallons Per Hour (GPH) 1" 35 2" 70 3" 105 4" 140 5" 175 6" 210 7" 245 8" 280 9" 315 10" 350 11" 385 12" 420 13" 455 14" 490 15" 525 16" 560 17" 595 18" 630 19" 665 20" 700 Note that it does not matter how tall your screen is, just how wide it is. Let's start with an overflow feed: In this case the amount of flow is pre-determined by how much is overflowing; the maximum flow you'll get to the screen will be what's going through your overflow now. This is easy to figure out by counting how many seconds it takes your overflow to fill a one-gallon jug: 60 seconds = 60 gph 30 seconds = 120 gph 15 seconds = 240 gph 10 seconds = 360 gph 8 seconds = 450 gph 5 seconds = 720 gph Take this gph number that you end up with, and divide by 35, to get the number of inches wide the screen should be. For example, if your overflow was 240 gph, then divide this by 35 to get 6.8 (or just say 7) inches. So your screen should be 7 inches wide. How tall should it be? As tall as can fit into the area you have, and, as tall as your light bulbs will cover. But how tall it is not as important as how wide it is. Pump feeds: Since with a pump you have control over the flow, start with the size screen you can fit into your space. If the screen will go into your sump, then measure how wide that screen will be. If the screen will go into a bucket, then measure how wide that screen will be. Take the width you get, and multiply by 35 to get the gph you need. For example if you can fit a 10 inch wide screen into your sump or bucket, then multiply 10 by 35 to get 350 gph. Thus your pumps needs to deliver 350 gph to the screen. You can construct your setup using any method you like. The only difficult part is the "waterfall pipe", which must have a slot cut lengthwise into it where the screen goes into it. Don't cut the slot too wide; just start with 1/8", and you can increase it later if you need to, ba 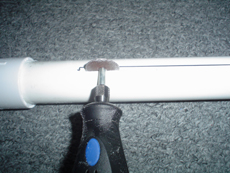 Now install the pipe onto the screen/bucket by tilting the pipe and starting at one side, then lowering the pipe over the rest. You may have to wiggle the screen in some places to get it to fit in: 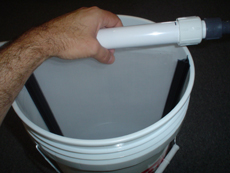 Lighting: This is the most important aspect of the whole thing. You must, must, have strong lighting. I'll list again the bulb I listed above: http://www.buylighting.com/23-Watt-R40-Compact-Fluorescent-Flood-5100K-p/tcp1r4023-51k.htm ... This the minimum you should have on BOTH sides of your screen. You can get even higher power CFL bulbs, or use multiple bulbs per side, for screens larger than 12 X 12 inches, or for tanks with higher waste loads. The higher the power of the lighting on the screen, the more nitrate and phosphate will be pulled out of the tank, and faster too. Operation: Regardless of which version you build, the startup process is the same. First, clean the screen with running tap water (no soap) while scrubbing it with something abrasive. Then dry it off and sand it with sandpaper on both sides. Then get some algae (any type) from your system and rub it HARD into the screen on both sides, as deep and as hard as you can. Then run tap water over the screen to remove the loose algae pieces; you won't see the spores that stick... they are too small, but they are there. Don't forget this algae rubbing part... it will speed up the start of your screen by a few days. Install the screen and turn on the water. You can leave the light on for 24 hours for the first week if you want to speed up the process; otherwise just put it on a timer for 18 hours ON, and 6 hours OFF. You will see absolutely nothing grow for the first two days. On day 3 you'll start seeing some growth, and by day 5 most of the screen should have a light brown coating. If this level of growth does not happen on your screen, your lighting is probably not strong enough, or it's not close enough to the screen. Increase the bulb power, or move it closer. When the screen looks something like this: 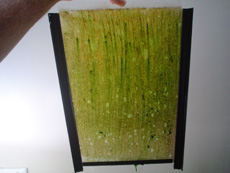 ...then you want to give it it's first cleaning, on ONE SIDE only. Take the screen to the sink, run tap water on it, and just push the algae off with your fingers (not fingernails): 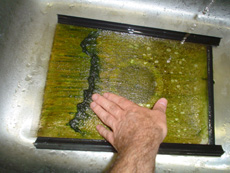 Wait a week, and clean the other side, gently. Wait another week and clean the first side again, etc. After a while you'll have to press harder to get the tougher algae off, and after a few months you'll probably need to scrape it with something, and it may eventually get so strong that you'll need a razor blade to scrape it off. But for now, be gentle; you always want some algae to remain on the screen when you are done. NEVER clean it off completely. Don't forget to test your Nitrate and Phosphate before you start your filter, and each day after. I use Salifert: http://www.marinedepot.com/ps_AquariumPage~PageAlias~test_kits_salifert.html Post your pics of how you build it, the growth day by day, and your nitrate and phosphate readings, so we can all see how you are doing! 888-CORAL-REEF Filtering discussion: www.AlgaeScrubber.net |
worley   Hobbyist Posts: 147 Kudos: 67 Votes: 31 Registered: 12-Jan-2004   | Now to figure out how to fit one of these into an AquaMedic Percula 90, that has the filtration in the entire back of the tank, so no sump... Hmmm, we have the loft/attic above... hmmm... drilling holes in the ceiling springs to mind  , now to convince the other half , now to convince the other half  I guess I could make a slim plastic box for it to go in, rather than a bucket, and fit flatter fluroescent tubes inside, then it could be mounted on the wall next to the tank with a pump inside... But I still like the idea of putting a sump in the loft/attic ;-) Luckily, being a 500 year old building the ceiling is pretty low, so won't need much pumping head (maybe 6ft)  Out of interest, how many people here have tried an algae scrubber? |
mattyboombatty      Moderator Tenellus Obsessor Posts: 2790 Kudos: 1507 Votes: 1301 Registered: 26-Mar-2004  | I have not used this method for algae scrubbing, though I've grown cheatomorpha and other algaes in the sump/fuge in my old tank. I think that is still technically an algae scrubber. Critical Fertilator: The Micromanager of Macronutrients |
| santamonica Enthusiast Posts: 152 Kudos: 17 Registered: 19-Sep-2008 | Worley, glad you would like to try one. Probably about 30 people right now are trying them on various sites; I'll post their results as they come in. When built right, they always lower nutrients and nuisance algae  Yes chaeto is technically a scrubber too, just not as efficient. As for a flat version with T5HO's, how about this:  888-CORAL-REEF Filtering discussion: www.AlgaeScrubber.net |
| santamonica Enthusiast Posts: 152 Kudos: 17 Registered: 19-Sep-2008 | Reminder Of The Day: What Scrubbers Consume: Algae scrubbers consume INORGANIC nitrate and phosphate. These things are what your test kits read, and what the nuisance algae on your rocks and glass require to live. What scrubbers don't consume is ORGANIC nitrate and phosphate. Organic nitrate and phosphate have another name: Food. Any and every piece of food you put into your tank has nitrate and phosphate in them, but they are organic. Scrubbers leave them in the water for the corals to eat. Skimmers do the opposite: Skimmers remove the organic nitrate and phosphate (food), and leave in the inorganic nitrate and phosphate; these inorganics are then used by the nuisance algae on your rocks and glass to grow. 888-CORAL-REEF Filtering discussion: www.AlgaeScrubber.net |
| worley Hobbyist Posts: 147 Kudos: 67 Votes: 31 Registered: 12-Jan-2004 | Well, I've managed to get the go-ahead to put pipes through the ceiling into the loft where we've built an animal room. The own downside is that I've only really got permission to use the really thin pipes that you use on RO units. I was thinking, I've got a 90 litre tank spare that I could put up in the loft, and turn into a sump / algae scrubber, but the main idea was that I would use something like a dosing pump that fits to that sort of pipe, and pump water slowly upstairs, then use a spare 1200lph pump I have to pump the water around the sump over the alage scrubber, so I'd need to have about 8" of water in the bottom with the scrubber lifted out. Then the water would have to drain under gravity back into the tank. I'm not sure though, if the water will overflow fast enough down the small pipes. First of all I need to find a pump that has up to 10ft head that fits the small RO pipes. I can test the flow rate by drilling a hole in a bucket and putting the pipe in and see how long it takes to empty the bucket. Can you guys see anything wrong with the plan of using a slow pump to fill the sump, and a higher flow pump inside the sump? It still should be able to turn over all the water in the tank once or twice a day. Thanks for the design, that may do, but I also want to get some cultures of phytoplankton and amphipods up and running (want a mandarin, so want to populate the huge amount of liverock I've got for a few months before getting one), so putting them all in one place would be easier. Comments please, and can anyone suggest a pump?  |
Gourami  Mega Fish Posts: 1205 Kudos: 477 Votes: 1 Registered: 23-Apr-2002 | How does this do with a planted tank? |
| worley Hobbyist Posts: 147 Kudos: 67 Votes: 31 Registered: 12-Jan-2004 | Well, I may have found a pump, but, two problems: a) I'm not sure how it will like salt water (I'll ask the company tomorrow) b) it's £200 ($370) http://www.ro-man.com/shop/product_info.php/cPath/28/products_id/245 It does however, have 67m head, which is pretty impressive, not particularly fast flow rate, but not expecting that on 1/2" pipe (would probably get an adapter and put 1/4" pipe on). I may have to give up on this idea if I can't find anything more reasonable for 1/4" pipes. But there's still the choice of mounting it on the wall next to it (just tricky with the tank up and running now) |
| santamonica Enthusiast Posts: 152 Kudos: 17 Registered: 19-Sep-2008 | Worley: Easy fix: get a cheap "peristaltic pump". Here's a new one for $99: "Aqua Medic Dosing Pumps - SP 3000": just search for it. ...although it does not pump much per day. This ebay one: http://cgi.ebay.com/Manostat-Simon-Variable-Peristaltic-Varistaltic-Pump_W0QQitemZ170262805091QQcmdZViewItem?hash=item170262805091&_trkparms=39%3A1%7C66%3A2%7C65%3A15%7C240%3A1318&_trksid=p3286.c0.m14 ...pumps up to 2 gal/min. A pump like this will basically give you a "recirculating scrubber", since the water in the scrubber will go around many times before it comes back down to the tank. But should work. Gourami: Not sure. Will reduce nitrate and phosphate, but may take the nitrogen from the plants. 888-CORAL-REEF Filtering discussion: www.AlgaeScrubber.net |
| worley Hobbyist Posts: 147 Kudos: 67 Votes: 31 Registered: 12-Jan-2004 | Thanks, I couldn't remember the name of the type of pumps, used to use the SP 3000's on an Aquamedic nitrate reduction filter, along with the computer control/probes, way to much hassle IMO. |
Mez   Ultimate Fish Guru Asian Hardfeather Enthusiast Posts: 3300 Votes: 162 Registered: 23-Feb-2001 | Yeah. Like i said on the other 6 sites i am a member of. Its a good idea... I presume you plan on selling this product worldwide after a bit of promotion? |
| santamonica Enthusiast Posts: 152 Kudos: 17 Registered: 19-Sep-2008 | No, I don't want to. But you can if you like. There is no patent or anything. 888-CORAL-REEF Filtering discussion: www.AlgaeScrubber.net |
| santamonica Enthusiast Posts: 152 Kudos: 17 Registered: 19-Sep-2008 | Today's build-of-the-day is the very first solar powered screen that I've seen on any thread. Lighting will not be a problem with this one. Uses a simple pressurized pvc fr 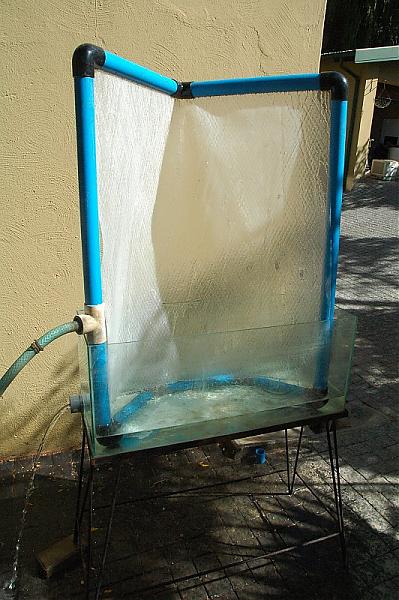 888-CORAL-REEF Filtering discussion: www.AlgaeScrubber.net |
| worley Hobbyist Posts: 147 Kudos: 67 Votes: 31 Registered: 12-Jan-2004 | I wonder if anyone can think of a way of automatically flushing it to clean most of the algae off? Or is that just being super lazy |
| santamonica Enthusiast Posts: 152 Kudos: 17 Registered: 19-Sep-2008 | Auto-cleaning would have to use a manufactured mechanical device. They use them for large-scale screens:   888-CORAL-REEF Filtering discussion: www.AlgaeScrubber.net |
| santamonica Enthusiast Posts: 152 Kudos: 17 Registered: 19-Sep-2008 | Today's N-and-P-lowering successes are both from the UR site, and both of them were a build-of-the-day that I previously posted: "Col" says: "Test results from tonight are N=7.5 & P=0.1 I've not had test results as low as this before. The lighting on side 2 of the screen is really making a difference. Thanks SantaMonica for all your help! "johnt" says: "Tested today and nitrate has come down from 50 to less than 25: Date------8/21--------9/7---------9/14--------9/20 Nitrate----60-----------*-----------50-----------<25 pH---------8.24---------*-----------8.23---------8.27 Mag-------1394--------*-----------1335--------1440 Cal---------500----------*-----------465----------460 dKH-------7.2----------*------------8.6----------8.3 SG---------1.026-------*------------1.026-------1.026 Temp-----26.3---------*------------25.3---------24.8 Phos------0.25---------*------------0.1-----------<0.1 * = Started Scrubber "First a big drop in Phosphate and now an equally impressive drop in Nitrate" 888-CORAL-REEF Filtering discussion: www.AlgaeScrubber.net |
| Alex Fish Addict 510 Posts: 721 Registered: 03-Oct-2004  | worley mate you should use that pump to charge up a heap of penductors clicky would provide some really awesome flow! Imo on the desired algae scrubber one would not need anywhere near that much pressure unless your screen is about 40m high. Instead i would personally have a look at using an aquabee, eheim, hydor or similar pump to operate it. |
| Gourami Mega Fish Posts: 1205 Kudos: 477 Votes: 1 Registered: 23-Apr-2002 | Would this work in a pond system outside? |
| worley Hobbyist Posts: 147 Kudos: 67 Votes: 31 Registered: 12-Jan-2004 | The idea will work on any water system, they use giant versions to remove nitrate/phosphates from rivers and lakes |
| santamonica Enthusiast Posts: 152 Kudos: 17 Registered: 19-Sep-2008 | It's Time For The Santa Monica 120 Acrylic! Ok it's time to move my screen from the ugly bucket by the sink (with hoses, wires, timers, etc) to under the tank where it can sit on the sump. The idea for this design came from all the readers who tried to install their screens over their sumps. Low profile is important for me, as it is to anyone without a fish room, so I picked 6" as the max height. That would give me room to lift out the screen and pull it out of the stand, with room to spare. And at 6" height, the pvc pipe will take up 1", leaving 5" for the screen. So the screen will be 5 X 24 = 120 sq in. This is good for a decently-stocked 90 like mine, or a lightly stocked 200 with no real nutrient problems. Here is the initial layout that I gave to the acrylic shop: Wide screens like this are more efficient and powerful (with the same light) than tall narrow screens, but require more flow. My screen will need 24" X 35(gph/in) = 840 gph. However the same 120 sq in screen placed vertically would only need 5" X 35(gph/in) = 175 gph. The vertical placement has a disadvantage in that the water at the top gets filtered by the top of the screen, but then has to travel over the lower parts of the screen. Since it's already been filtered at the top, not much happens on the bottom part of the screen. This problem is eliminated with a horizontal screen since all the water that passes over the 5 inches of screen needs filtering. Another good use for a low-profile screen like this would be for on-top of tank, when you want the pods to drain directly down into the display. Or, if you don't have a sump, the on-top placement would work great if you put the pump in the display. The acrylic box came back from the acrylic shop, finished beautifully. They still have the plans, so if anyone wants the same box, call Hastings Plastics at 310-829-3449 and say you want the "aquarium algae filter screen box". The only change would be the "U" cutouts for the pipe: Tell them to make them a little larger round, and a little deeper, since the pipe was hard to push into them (and it stuck out a bit which made the lid not close all the way. ). I did a little grinding, and now it's perfect. The cost was about $100, without shipping. Here's how is arrived:  Unwrapped. Notice the bottom and ends are mirrored acrylic, with the mirror facing inwards: 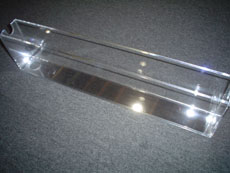 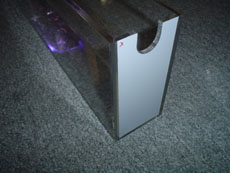 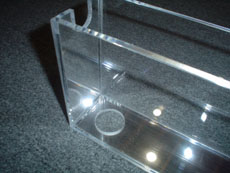  The lid fits mirror-side down: 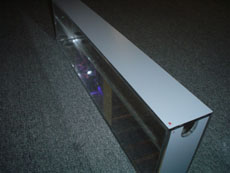 The pipe fits snug so that little light will escape. I had to grind the "U" cutouts a little bigger and deeper so the pipe would not block the lid: 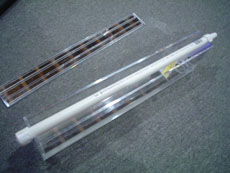 The lid fit perfectly after the pipe cutouts were enlarged:  Here are the lights. They come with a combo of 10K and actinic: www.petstore.com/ps_viewItem-idProduct-CU01124-tab-4.html I removed the bulbs, and got 6500K and 3000K from here: www.plantlightinghydroponics.com/ge-t5-ho-fluorescent-lamps-c-73_623.html I'm going to set it up with 6500K on one side and 3000K on the other. Nobody recommednds 10K for macros, except for one person: The guy at Inland Aquatics that has been growing turf screens for 10 years. So, I'll try 10K soon, but not to start. Maybe you can start with 10K on yours and let us know how it works Then I placed the lights on the acrylic and marked off where the the bulbs will be shining through: 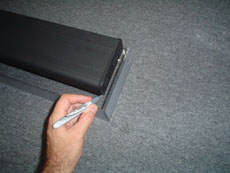 Some method has to be used to mount the lights to the sides. I'm using acrylic blocks and acrylic glue: 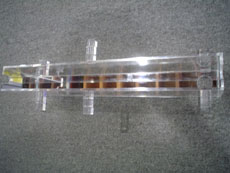 The light-mounting is a bit tricky, because the lights need to be removeable, yet be pressed up against the acrylic to minimize light leakage (which would be important for an above-the-tank placement in plain view). The lights are then placed in the mounts: 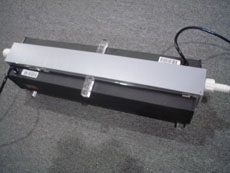 The overall size ended up being 6.5" high X 6" deep X 24" long: 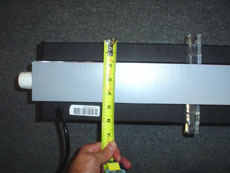  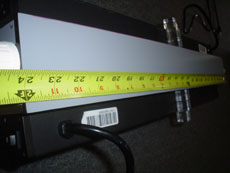 Here's a size comparison; the inside of the stand was once filled with filtration devices, and now it's just water: 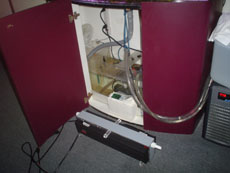 Taped and ready for spray painting: 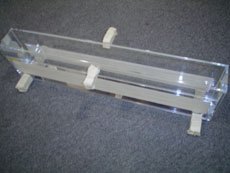 First coat was a me  After painting with black primer, and putting lights on: 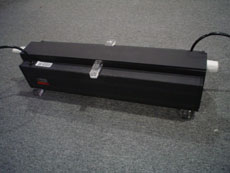 End view: 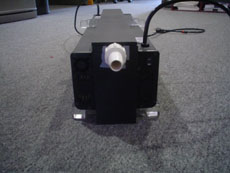 Side view: 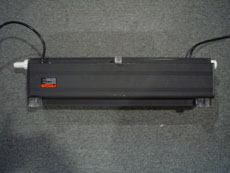 Lid off, ready to use: 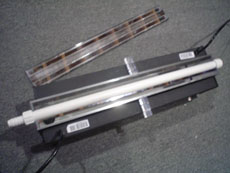 The long, low-profile pipe and screen:  Lights on: 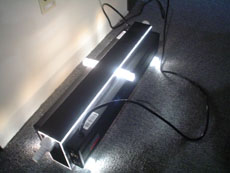 Setting on sump: 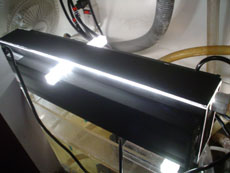 Running, with front light removed to see flow: 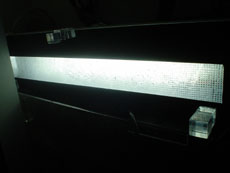 So, I rubbed algae from my original bucket into the new screen, then installed the screen and turned it on. I'm starting with the flow and lights on 24 hours, in order to speed up the growth. I'll decide later if I'm going to pulse the flow, and I'll wait for the algae to grow a bit before putting the lights on a timer. Also, there is no fan, because I wanted to make it as simple as possible for folks who wanted to try it themselves. I may try a fan later, but for now let's see how it does without one. Also also, I'm leaving my original bucket running, for safety, but of course this will slow down growth on the new screen. 888-CORAL-REEF Filtering discussion: www.AlgaeScrubber.net |
| Jump to: |
The views expressed on this page are the implied opinions of their respective authors.
Under no circumstances do the comments on this page represent the opinions of the staff of FishProfiles.com.
FishProfiles.com Forums, version 11.0
Mazeguy Smilies