FishProfiles.com Message Forums |
| faq | etiquette | register | my account | search | mailbox |
| Back to Nature Slim-line Tank Background | |
TW  Fish Master * * *Fish Slave* * * Posts: 1947 Kudos: 278 Votes: 338 Registered: 14-Jan-2006    | Hi all I'm thinking of using Back to Nature Slim-line background, but wondered if any members could share their experience with it. Are there many drawbacks in using it, such as problems in getting a good seal. What happens when / if water does get behind it? Appreciate any opinions on whether they are good, or more trouble than they are worth. Cheers TW |
keithgh      *Ultimate Fish Guru* Posts: 6371 Kudos: 6918 Votes: 1542 Registered: 26-Apr-2003    | Back to Nature Slim-line background Exactly what do you mean by that? Regardless of what you use it must be properly sealed other wise any water that gets behind could easily become stagnant because of a poor water circulation. Keith   Near enough is not good enough, therefore good enough is not near enough, and only your best will do. I VOTE DO YOU if not WHY NOT?  VOTE NOW VOTE NOW   VOTE NOW VOTE NOW  |
TW  Fish Master * * *Fish Slave* * * Posts: 1947 Kudos: 278 Votes: 338 Registered: 14-Jan-2006    | Back to Nature Slim-line background Hi Keith It's the product name. See this link http://www.backtonature.se/english/slimline.html Installation tips found here http://www.backtonature.se/english/montera_slimline.html Regardless of what you use it must be properly sealed other wise any water that gets behind could easily become stagnant because of a poor water circulation.Yes I know, but I'm looking for feedback from any users, as to how difficult it proved to get it properly sealed and any other drawbacks they found with it's use. It's very costly, so I'm doing my homework before I come to a decision as to whether I'd use it. Cheers TW |
brandeeno Mega Fish Posts: 929 Kudos: 636 Registered: 13-Sep-2007    | After reading the instructions I'd be inclined to put some extra gobbs of silicone around the edges of the BG to seal it off completely... it does seem like water would get trapped back there and cause a problem because the instructions don't "seal" the background in, they just attach it to the glass firmly... I dont have experience with it, but just my take on the product after reading it... its a really cool idea though (could be cool to get some moss maybe growing on the back in some places...) \\\\\\\"an ounce of prevention is worth a pound of the cure\\\\\\\" |
keithgh      *Ultimate Fish Guru* Posts: 6371 Kudos: 6918 Votes: 1542 Registered: 26-Apr-2003    | Robyn Treat it as putting in a window. Do as per instructions then on the edges give a double run of silicone by that I mean two runs side by side as close to all the edges as possible then when installed go around again on all the edges and don't skimp using it. If you do not know how to use a gun take it to a glazier and get him to install it for you or find some one who knows how to use a gun correctly not think they can. One little gap and the seal will not work at all. Keith   Near enough is not good enough, therefore good enough is not near enough, and only your best will do. I VOTE DO YOU if not WHY NOT?  VOTE NOW VOTE NOW   VOTE NOW VOTE NOW  |
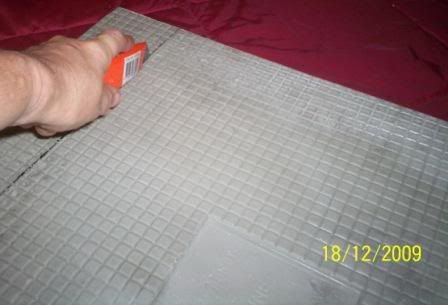
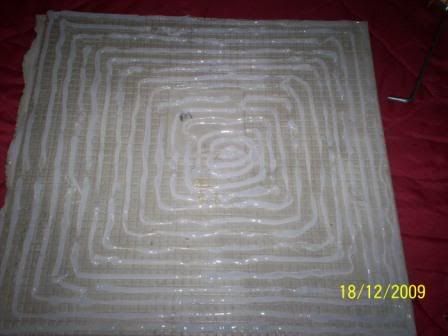
TW  Fish Master * * *Fish Slave* * * Posts: 1947 Kudos: 278 Votes: 338 Registered: 14-Jan-2006    | Thanks Keith & brandeeno Well, after multiple changes of mind & many pm's from another hobbyist giving me confidence to go ahead, I did end up going ahead with the Back to Nature Background, Slim-line Red Gneiss. I heard some bad reviews – mainly regarding water / debris finding access behind the background & the resulting hygiene issues – but these seemed to be about different brands or types or related to issues of insufficient silicone to ensure a tight seal. I'm glad I did hear the bad reviews, because at least I was forewarned on how important a good seal is. I'm covering the back wall & one of the side walls. In the end, I figure that if the silione is able to hold a tank securly together without leaking, if I follow the advice from that other hobbyist, I should be able to achieve the same .... but then, who am I kidding ! Just hope I don't live to regret this, because with the amount of silicone I've used so far (job not finished) heaven help me if ever I want to take this sucker off. The most important tips that other hobbyist gave me were:- * Use heaps of silicone. * When you think you’ve bought enough silicone – double it ! * Cut the background smaller than the tank silicone (ie the silicone holding the tank sides together), otherwise it won’t sit flat against tank wall. * Weigh it down while silicone dries, to ensure good contact between background & tank wall * Seal all end edges well * Use heaps of silicone (much more that the instructions say) oops, did I say that already - well that was his very most important tip! Anyway, I’ll let the pictures tell the story Trim the height to fit the tank. Place all pieces in tank, in their position, for a test fit for accuracy.  Instruction Card indicating manufacturer’s recommended use of silicone (black blobs indicate silicone) I think that’s enough silicone to make it stick – but not anywhere near enough to make the seal watertight & debris proof. Showing how much I used  One full tube on each background piece was used. Using a spreader, the lines / beads of silicone were blended into a solid coverage, before positioning in tank. Up to now, I more or less followed manufacturer’s instructions, except in relation that I used much more silicone. Weigh it down Each piece was allowed to dry before the next step.  Seal the Edges. When dry, a bead of silicone was run along the end edge & the glass. Allowed to dry Process was repeated until all pieces in place and the last piece had dried Seal the Edges & the Overlap. Another bead of silicone was run around all edges to seal, as well as the overlap where the pieces join. On the overlapping joins, some fine grained peat (not pictured) was pushed into the silicone (to counteract the fact that silicone will whiten as it ages)  I’m pretty sure it’s sealed enough, but just to make sure, I plan on putting another bead of silicone over all the joins. Heaven help me if I ever want to remove this ! Still have the side wall to do. I’ll add more pictures when tank is upright & with water. Cheers TW |
brandeeno Mega Fish Posts: 929 Kudos: 636 Registered: 13-Sep-2007    | TW glad you decided to go with it! It seems like a great looking BG. Can't wait to see how it looks in your tank with a beautiful scape and fish  keep us updated! keep us updated!-Brandon \\\\\\\"an ounce of prevention is worth a pound of the cure\\\\\\\" |
Babelfish                   Administrator Small Fry with Ketchup Posts: 6833 Kudos: 8324 Votes: 1570 Registered: 17-Apr-2003    | Agreed  looks like it's been applied quite well, wish I'd gone and bought stock in the silicone companies. looks like it's been applied quite well, wish I'd gone and bought stock in the silicone companies.Full tank shot when all set up please  ^_^  |
| Jump to: |
The views expressed on this page are the implied opinions of their respective authors.
Under no circumstances do the comments on this page represent the opinions of the staff of FishProfiles.com.
FishProfiles.com Forums, version 11.0
Mazeguy Smilies